Wednesday, 1 February 2012

Up the garden path

Today blog is how i made a garden out of a cd rom i made it for a a challenge at ditzy-craftymess facebook group here it is step by step hope you like it.

First of all i had to make the house this was made out of a bit of old shoebox i made it into a cube shape and stuck it together had to wait till dry so was fastened together with pegs till dry

Next was the roof i got a bit more shoebox and made a roof shape and stuck that in the same way as the base and left to dry

When it was dry i covered the roof and house in paper and added windows and doors like in the pic and put on one side

Next came my garden base for this i needed an old cd rom and some foam padding

I stuck the foam padding to the cd rom with glue and cut round it

Then i needed some textured paper to cover the foam and cd rom this is white but i needed green so ..

I coloured it green with felt tip pen you only need a small bit  just so it covers the cd rom

Here is the cd rom covered  when you covered the cd rom turn it over and add white paper or card to the back to hide where you stuck the green paper on lol.

Then you can add the house add a base to the bottom of the house so it will stick to the garden like in the pic above.

Now for the flowers you need a small bit of wire and some paper flowers.

Stick them together with the wire in middle like in the pic.

Then make a small hole in the paper and foam so you can add the flowers add a spot of glue to the flowers and put in the hole you have made.

Add more flowers,a path,a cat and a sold sign also i added a twig from out my garden. You can add whatever you like but i think this makes a great new home 3d keepsake don't you ?

You could also do a park,a beach,a village or a zoo why not give it a try.

Thank you for looking at my blog call again soon :)

Tuesday, 31 January 2012

When is a shoe not a shoe

I wanted to enter a challenge to alter a shoe in some way so i came up with a play cot the challenge is for Ditzy-Craftymess facebook group here is the link
http://www.facebook.com/media/set/?set=a.10150231929193524.365031.536648523&type=3#!/groups/ditzycraftymess/

And here is the step by step of how i did the shoe hope you enjoy it

Here is the shoe before i started take any old shoe

I then painted it with metallic paint it needs more than one coat this pic was just one but i had to paint it twice

Here is the shoe all painted with the first coat

When the shoe has had the 2nd coat of paint you need to think about how to decorate it at this paint i had no idea lol

I glued the shoe to a shoebox cut in half so i had height to work on

I then got the lace material and glued it with the glue gun to the Base of the shoe

Next i needed a hood for the cot so i got some stiff card and glued to the back of the shoe 

And then covered that with some lace materiel has the base

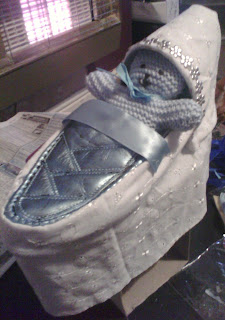
This is the finish one i made a blanket and pillow out of scrap materiel,added some ribbon to the front of shoe to loo lie a cover and some paper flower border to the hood i also knitted the teddy

And here he is Dudley in his new cot made from a old shoe i think he is very happy there to x

hope you like my blog for today and call again soon :)

Monday, 30 January 2012

My 1st ATC and a bit of love

Today i made my 1st ATC always wanted to make one so today has a challenge i did i made one i was disqualified because i did not read challenge right lol but never mind i had a chance to make a ATC here it is
I am happy with it even if its a bit wonky lol

Another challenge i entered today was for a love card but not using red or pink so i went for the monochrome look  here is the card

I am happy with this one to 

Tomorrow blog will be how i altered a shoe into a baby cot for a challenge in ditzy-craftymess group so look out for my step by step lol
Hope you like my blog for today call again soon :)

Saturday, 28 January 2012

Keep it in the family

Today i done well making cards i have done a whole family lol I would like to meet them.

Here is mum Jane she like purple

Here is Dad Martin He likes fishing

He is son Jack he is on his PS3 all the time

Here is Daughter Rose she like to sing and is going on X Factor lol

Here is the new member of the family baby Sally she a good baby lol

hope you like my blog for today call again soon :)

Wednesday, 25 January 2012

Watercolour card

Today i did a watercolour card something i not done very much has my hands shake to much. I did it for for a challenge here is how i did it.

Here are some of the things i used for the card you need a water resistant ink pad like stazon,watercolour paints or pens you can also use watercolour crayons, a image and card for mounting

Ink the stamp with the stazon well.

Here is the image stamped the stazon make a clear image.

This is how i started to colour the image with the paints i am using a watercolour brush to do this.

Here is the finished image done with the paints.

When dry mount on some paper and add to a card,add a greeting and some peel offs or any embellishments you like

Hope you have liked my blog for today call again soon :)

Tuesday, 24 January 2012

Get well soon Cards

Today my blog is a quick one has i am not feeling to great for a challenge today we had to make a get well soon card for a elderly relative here are mine the ones i entered and another one i did has i was not in a craft mood


These are the two i entered we had to enter one but not sure which one so did both lol

Close up

Close up  i like this one warm and cosy lol


This is a small one  the stamp was free with a craft mag and i coloured it with promarkers,

Anyway sorry not a good blog today has not feeling well
Thank you for looking at my blog and call again soon :)

Rubber stamping with bleach

I tried rubber stamping with bleach for a challenge here is the step by step of how i did it

This is what you need paper towels,dish to put bleach in,stamp,card and bleach
Put a few paper towels in the dish and add diluted bleach

This is the stamp i used but any open image stamp will do
Here are some of the papers i used depending on the paper for different results

Next place the stamp in the bleach and press down do not blob up and down has you will get bubbles

Next place the stamp on the paper you have picked and press down

This is to show you what happens when you blob up and down in the bleach you are trying not to let it bubble

These are some of the results i got has different paper make different results

I then cut out the flowers when the bleach was dry

I then added them to a card as seen above

Here is a close up of my card
I had a great time stamping with bleach why not try it and see
Thank you for visiting my blog call again soon :)


Followers

Click here for more graphics and gifs!

my cards